This guest post by Jim Goldstein is sponsored by BorrowLenses.com.
The natural world offers unlimited opportunities and subjects for photographers of all levels to make compelling images. But nature photography, particularly when wildlife is involved, can be challenging under the best of circumstances. It requires proper preparation. Just as the great masters of painting wouldn’t want to get stuck trying to paint a scene with the wrong brush, people should avoid heading into the field with the wrong lenses to capture their subjects.
One thing photographers who use digital single-lens reflex (DSLR) cameras can do to increase the odds that they’ll walk away with high-impact photos is to use the right tools for the job. Different lenses have different optical qualities that will give each image a characteristic look. Below you’ll find lens family overviews paired with example images to give you an idea of how they can help you highlight the beauty of your subject(s) and boost their impact to viewers of your photography.
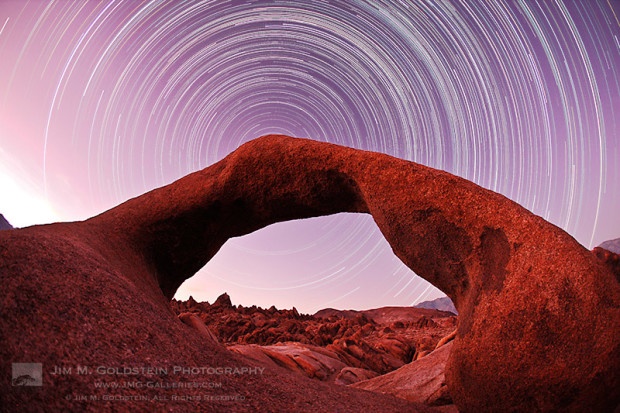
Fisheye (8-15mm)
Star trails above Mobius Arch in the Alabama Hills of California. Lens: Canon 15mm FisheyeFisheye lenses are a lot of fun to use with landscapes. They have two unique qualities:
They take in a very wide angle of view, often 180º.
They have a very short focal distance, allowing you to get within inches of your subject
The most distinctive visual quality provided by these types of lenses that viewers notice is the distorted perspective, namely barrel distortion. Distortion is something photographers either love or hate. I love distortion and the effect it brings to my photography. For those who don’t like the distortion, you can use a fisheye to get the wide field of view and then run 3rd party software applications like Optics Pro Elite v8 Softwareto remove the distortion.
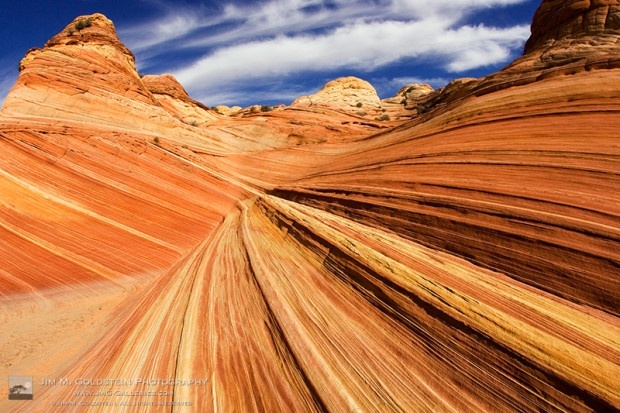
A fisheye view of the Wave sandstone formations.One of the biggest challenges in using a fisheye lens is keeping unwanted elements out of your image. This can include people or objects on the periphery of the scene you’re photographing. Even your feet can get in the field of view. A lot of people I know often use this lens while laying down. Shooting with this lens is a different but very fun experience.
Ultra-wide (16-24mm)
Zabriskie Point – Death Valley National Park, California. Lens info: Canon 16-35mm f/2.8L II USM at 18mmUltra-wide zoom lenses lack the strong distortion of a fisheye lens, but often on the wider end of the focal length spectrum will still show some degree of barrel distortion. The focal length of ultra-wide zoom lenses can range from as wide as 10mm to 35mm.
The lens I use is a Canon 16-35mm f/2.8L II lensand it is one of my most frequently used lenses. The longer focal lengths lack distortion while the wider focal lengths provide the distortion that I like.
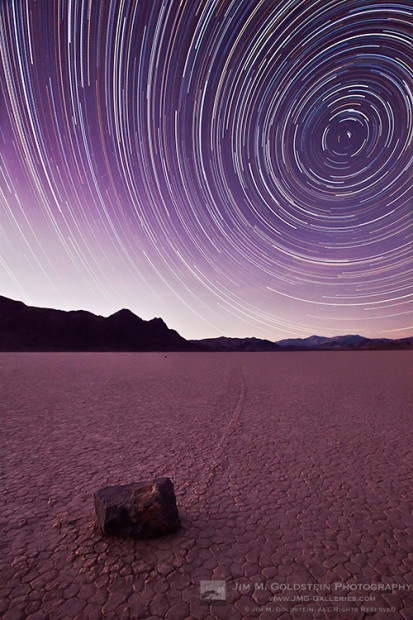
Racetrack Star Trails.The downside to ultra-wide lenses are that they do show signs of vignetting. This is most noticeable when using a filter in combination with shooting at the widest focal lengths. Vignetting appears most visibly with full frame sensor cameras. Cameras that have a magnification factor (non-full frame sensor cameras) often avoid the effects of vignetting as the projected image falls outside of the sensor’s range of detection.
Standard Focal Lengths (24-90mm)
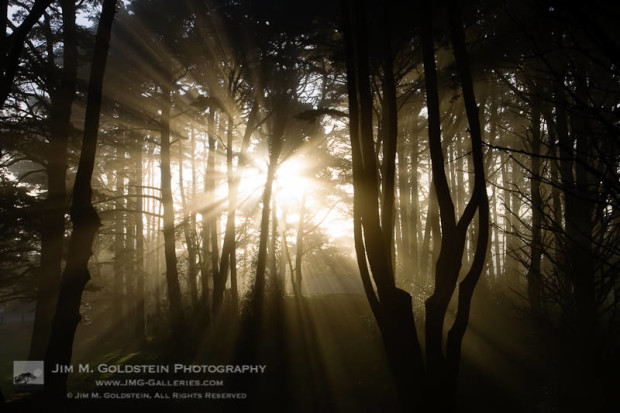
Sun shining through a grove of Monterey Pines (Pinus radiata) – San Francisco, California.Standard focal length lenses span a focal length of 35-90mm. As an example, 35mm lenses are used for travel and cinema, 50mm lenses are often used for photojournalism, and 85mm lenses are often used for portraiture. The wide range of use makes these lenses quite utilitarian and give photographers flexibility in the field.
The downside to using standard focal length lenses is that they don’t cover subjects requiring more extreme focal lengths, such as wide angle environmental images or telephoto wildlife images.
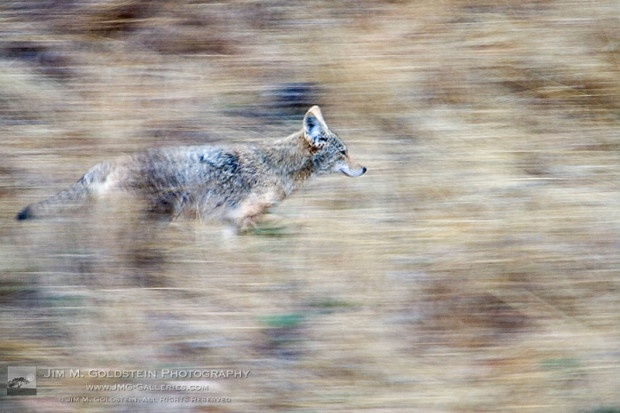
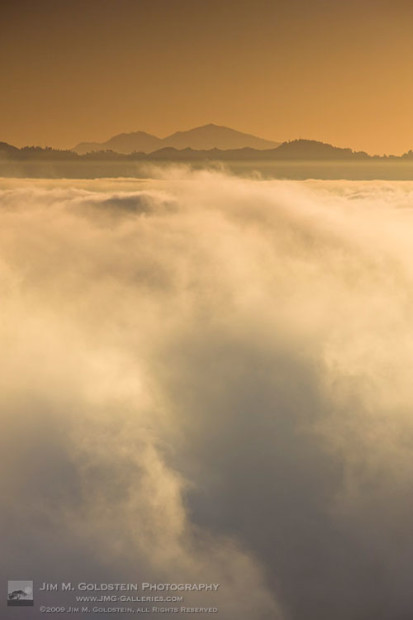
Telephoto (70-200mm)
A coyote runs through the hillside blending into his environment.It might surprise people to know that some of the best landscape photos can be obtained with longer focal lengths provided by telephoto lenses. Lenses with longer focal lengths provide a Telephoto Effect that compresses the perceived distance between objects in the foreground and background of an image. This effect can provide a great deal of visual impact. Telephoto lenses, of course, are also great for wildlife photography as they help bring the viewer closer to the subject to see greater detail.
Fog fills San Francisco Bay with a silhouette of Mount Diablo in the distance – San Francisco, California.Telephoto lensesoften range in focal length from 75 to 400mm and, depending on the magnification, will provide differing degrees of the Telephoto Effect. These types of lenses provide a great deal of flexibility, allowing a photographer to be some distance from their subject. On the downside, telephoto lenses require a longer focusing distance limiting photographers from getting too close to their subject in order to avoid out of focus images.
Longer focal lengths narrow the depth of field, which is another impact telephoto lenses have on images. This requires a more precise placement of focus on the subject that you feel is most important.
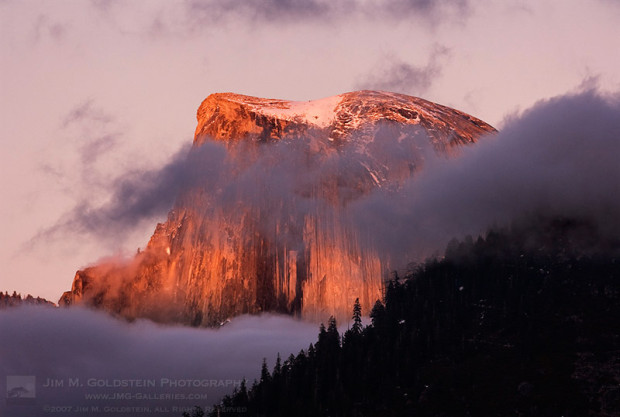
Super Telephoto (200-1200mm)
Last light falls on Half Dome as the sun sets.Super-telephoto lensesrange in focal length from 300 to 1200 mm. These types of lenses share similar optical and visual qualities as telephoto lenses, albeit more extreme. One additional thing to consider when shooting at such extreme focal lengths is the increased sensitivity to vibration. At extreme focal lengths, the slightest movement will be detectable and result in blurred images. The best way to avoid this is to use a tripod, shield your camera/lens setup from wind, and use mirror lock-up if your camera has this function.
Perigee Moon & California Oak near the Monterey coast, California.
Macro (60-180mm)
Fall leaves.Macro lenses enable you to magnify your subject to greater than life size. Macro photography can be used to highlight a subject in a clinical way with little interpretation or to artistically highlight form and color. While most macro lenses will allow you to get in close to your subject, few allow you to get as close as a Canon MP-E 65mm lens which creates results bordering on microscopy.
The downside of macro photography is the need for a good amount of light, patience and sensitivity to vibration. Each of these can be overcome with external lighting, a focusing rail, good technique and the use of a shutter release or timed shutter.
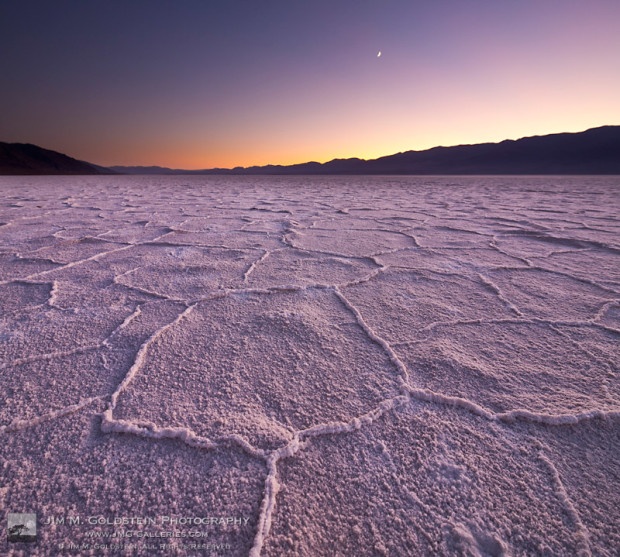
Tilt-Shift (17mm, 24mm, 45mm & 90mm)
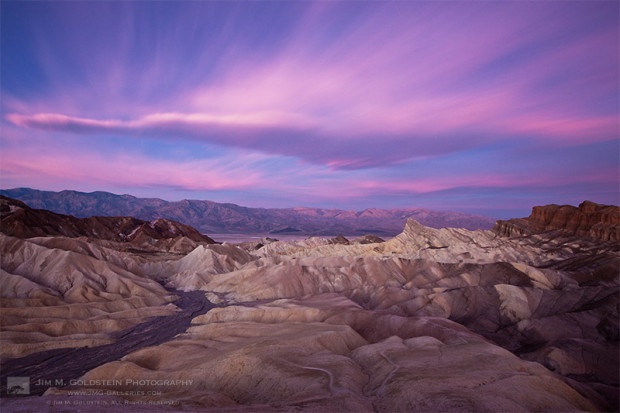
Badwater Sunset – Death Valley National Park, California.Tilt-shift lensesare specialized lenses that allow you to adjust the plane of focus by physically repositioning lens elements. This can result in sharper images and provide a means of gaining greater depth of field at lower f-stops.
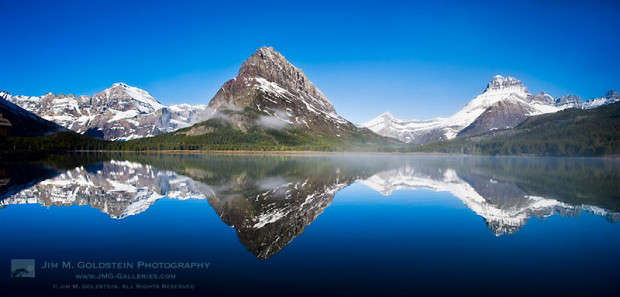
Fog forms over Swiftcurrent Lake and Mount Grinnell at sunrise in Glacier National Park, Montana.Another added benefit of tilt-shift lenses is their ability to provide an alternate method of creating panoramic photos. The tilt-shift capabilities allows you to keep your camera in one position while you shift the visible scene across your sensor. In a nutshell, it’s like panning without ever moving your camera. The big bonus with this technique is that there is no introduction of parallax distortion, making for a simplified means of capturing and post-processing panoramic photos.
Second Body — Don’t Get Caught off Guard
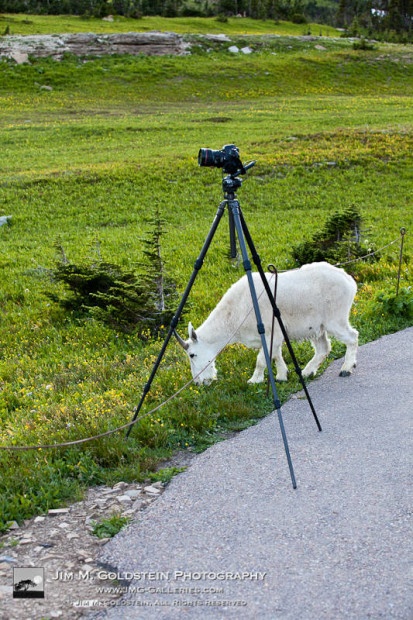
While much of the discussion so far has centered on lenses, it is incredibly important to highlight that having a second DSLR body on-hand can make a huge difference. Case in point: on my last trip to Glacier National Park, I was shooting a time-lapse with my camera and a mountain goat came up so close to me that I couldn’t focus my camera on him. In fact, he came so close that, for safety’s sake, I had to step away. I would have never documented this if I hadn’t had a second camera on-hand. For more serious work, a second body helps as a backup in case anything catastrophic happens to your primary camera and it allows you to work at the same time with multiple lenses of differing focal lengths.
Outfit Your Excursions on a Budget
With all these recommendations you might think that money is no object but, like you, I operate on a budget. My secret to finding and using the right tool can be heavily attributed to the fact that I can rent the right gear for the right trip or assignment. To convert your camera bag into an endless home for new and great gear like I have, I recommend renting the gear you want, when you want it from BorrowLenses.com.
And, after you’ve rented your gear, planned your trip, and taken your wonderful nature photos, remember to enter the National Wildlife Photo Contest. There are wildlife- and landscape-specific categories as well as $6,000 in prizes, with a Grand Prize trip for two to Churchill, Canada where you can see and photograph polar bears.
About Jim Goldstein
Jim Goldstein is a San Francisco based professional photographer and author who has been in numerous publications, including Outdoor Photographer, Digital Photo Pro, Popular Photography and has self-published a PDF eBook Photographing the 4th Dimension – Time covering numerous slow shutter techniques. Follow Jim Goldstein on Google+ | Twitter | Facebook | 500px


 And, after you’ve rented your gear, planned your trip, and taken your wonderful nature photos, remember to enter the National Wildlife Photo Contest. There are wildlife- and landscape-specific categories as well as $6,000 in prizes, with a Grand Prize trip for two to Churchill, Canada where you can see and photograph polar bears.